This is a workflow for use with an Epson 3800 printer and 13” x 19” Epson Watercolor Radiant White paper.
1 Shoot in highest resolution and at the lowest ISO
2 Transfer photographs to the computer
3 Make a copy of the file you plan to edit
4 Open the copy file in Photoshop NOT the original
5 Change resolution to 360 dpi
Under Image menu> select Image Size> Uncheck Resample Image Box. Change resolution to 360Click OK6 Convert to TIFF
7 Convert to Profile
Under Edit menu>select Convert to Profile>from pull down menu select Pro38 WCRW>click OK8 Convert the file to 16 bits
Go to Image menu> select Mode> set for 16 bits per channel.9 Adjust file in Levels
To adjust the brightness and contrast of a black and white image, or to adjust the brightness and color balance of a color image, Layer>New Adjustment Layer>Levels. "Levels" opens a complex window with several buttons and a graph. The graph is called a histogram and is showing the tonal range of the image with the shadows on the left, the midtones in the middle and the highlights on the right. The 3 little triangles running along the line below the histogram are referred to as the input sliders. The color of each one (black, gray and white) shows what part of the tonal range that each one represents. There are 3 boxes above the histogram showing the numerical representations of every tone in the image. 0 is jet black and 255 is paper white.To the right of the input slider bar appear 3 eyedroppers. Notice once again that they are colored black, gray and white. Click on the white one which is the one on the right. When you move the cursor into the image you will notice it has changed from an arrow (or whatever else was the previous cursor shape) to an eyedropper. Click on the lightest area of significance. In other words, don't choose something like a bright white reflection off of a mirror or something similar. The image should look somewhat different after doing this and the histogram should change. Do the same with the shadows using the eye dropper on the left. For the midtones move the midtone input slider to the left to lower the contrast and to the right to increase the contrast. Ignore the midtone eye dropper. Click on the OK button to complete the procedure and then save the image.10 Edit image with clone stamp tool
11 Sharpen
Go to Filter: Select Sharpen>Unsharp Mask. Start withAmount 200Radius 0.3Threshold 0Change if not sharp enough or overly sharp12 Go to the File menu. Choose Print. A dialog box will automatically open titled "Print"
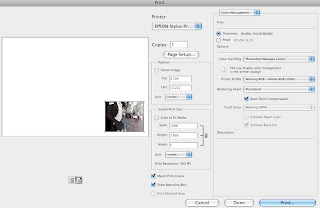
13 In the "Print" dialog box make the following choices
* for Printer select Epson 3800
* Moving to the upper right you have the options "Color Management" and "Output". Choose "Color Management"
* below this the Document radio button should be "on" the Profile should be Pro38 WCRW
* Click Page set up
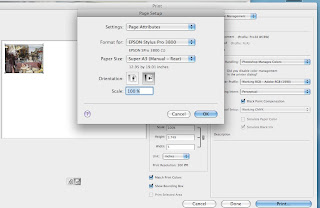
Choose from the Format for tab and set it to Stylus pro 3800
Choose from paper size Super A3 (Manual - Rear
Click ok
14 Choose Horizontal on the bottom of the picture box.
15 Uncheck Center Image
16 Click Print
17 Change printer to StylusPro 3800
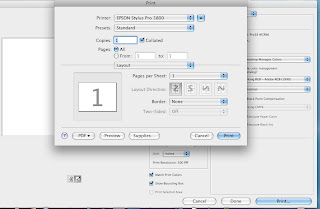
18 Click on Copies and Pages then scroll down to Print Settings
19 Change Media Type to (Watercolor Paper-Radiant White)

20 Click on Copies and Pages
21 Click off on Printer Color Managment

22 Click Print


